Granite Stone Paving
Last summer, I decided to tackle one of the those mega projects that I kept on pushing forward: the granite stone paving in front of Villa Linnea.

I knew it’s a big project to pave the 7.5×6 meter area in front of the main door. I did lay the curb-stones already several years ago but I didn’t find the motivation to get started with the knee-busting exercise to lay hundreds of natural stones. But with the workshop ready, I ran out of excuses and embraced the battle.
I ordered a bit more than 5 tons of natural stones which should be enough for 46 m2. The stones are 10×10 cm wide and 5 cm thick which should be more than enough for foot traffic. The grey stones come from Finland and have a rough, uneven surface. In addition, I ordered 5 tons of fine grey stone ash to bed the stones and fill the seems. I bought the stones from kivitori.fi which forgot to deliver some 100 stones and ended up making another free delivery. The quality of the stones varies. I would say that approximately every tenth stone is pretty useless because it either has drill holes or saw marks, but I counted that in my calculations.
I kicked off the project by spreading few centimetres of stone ash to create slopes away from the house and from the middle towards the sides to guide the rainwater. I then compressed the area with a 80 kg shaker, which I borrowed from a local builder for 25 Euro a day.

I started with laying three rows of stones along the curbstones.

The next step was to shape the circle.

Once the the circle was ready I started to fill in the remaining areas…

Until now I could lay mostly whole stones. But in the areas where the circle met the outer rows, I had to cut quite some stones to a fitting size with the angle grinder.
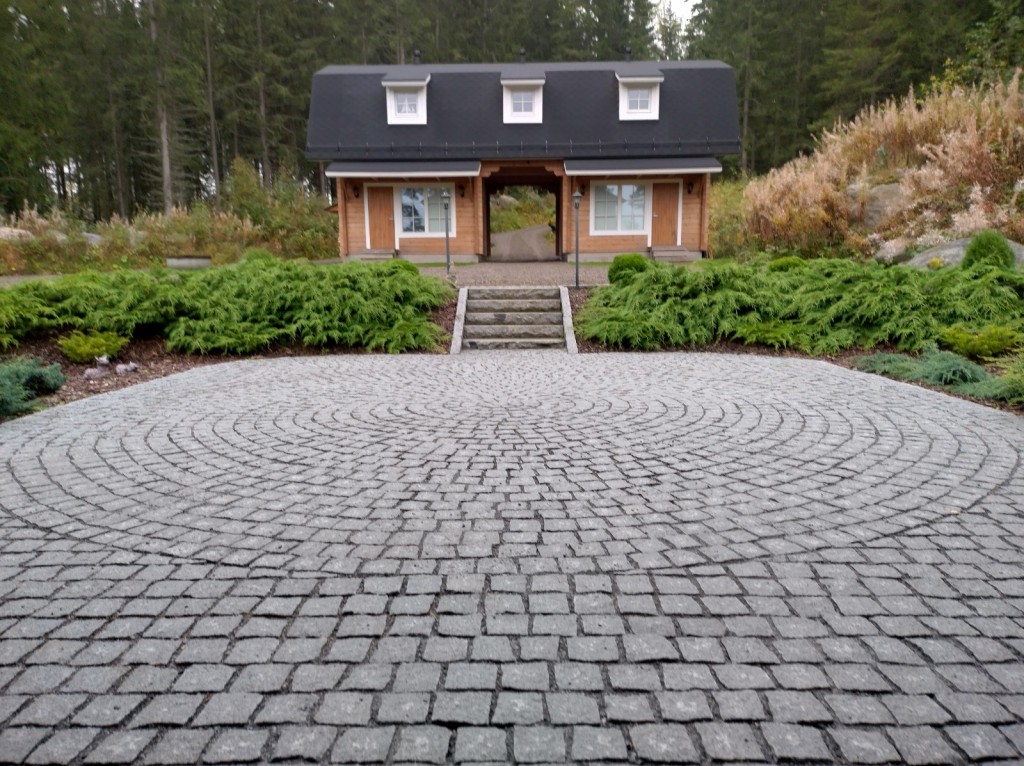
I typically worked a few hours per day to spare my knees and my wrist from any major damage. Hence, it took me all summer (and a few days past the summer) to complete this project. A total of 6 rows I did twice – pulling out the stones again – in order get a more even slope. Each of the 3.500 natural stones got in average 5 hits with the hammer which accounts for some 17.000 hammer movements. Ridiculous when one thinks about it…
But the results pays off.


We’ll see how it looks after the winter frost…
Adding a hot tub
With little money going into global travel, we decided to invest into a bit luxury at Villa Linnea. A hot tub was just what we maybe needed…
I always had planned to get one and therefore I had designed the terrace towards the lake in such a way that I could add a hot tub. But it was, as usual, again a bit more work to make things fit. The project started with removing a lot of terrace boards and some of the supporting frame structure.

After half a day, it looked like this:

The delivery of the Kimara Family Comfort model was one week late but the Kiitolinja driver super friendly. He had visited us four years ago and remembered the Villa.

Moving the 180kg heavy, 2 meter wide hot tub was its own challenge. A little crane would have been lovely. But getting it into the tight space between the terrace boards would have represented anyway a challenge.

So, we pushed and shoved the hot tub into place (from the lakeside without the terrace boards in the image above.
The installation of the heating stove should have been straight forward. I even ordered an additional piece that allows me to have the outlet of the water at the same side than the stove. But getting everything levelled and all screws tightened took some time.

But after that act, there was nothing else left than fill up the hot tub and start heating. It takes a bit more than one hour to fill the tub enough that one can start heating. It takes another 5 hours at least to heat the water from 8 degrees (which is the temperature when it comes from our deep well) to a cosy 37 degrees.

But all the effort is worth it after 30 minutes just relaxing…

Every End is also the Beginning of Something New
The workshop has been approved by the building inspector!
The building inspector paid us a brief visit two weeks ago, reviewed the building, and gave his formal approval. He took the liberty to drive through the workshop himself when leaving. The building permit signaled the end of the workshop building project, at least when it comes to building according to the initial plans.
But like with everything in life, the end of one chapter is the beginning of another. While building the workshop and enjoying the first years with it, we noticed some things we didn’t think of while planning it. One of the challenges is the height of the building in combination with the mansard-style roof. Whenever it rains, especially combined with a decent wind from the lake, then the lower part of the logs and the door gets wet. The humidity is not good for the wood over the years. Therefore, we decided to build small roof extensions on the front of the building.
The first step of this build was attaching the preassembled triangles that form the main structure of the roof extensions.

Nailing on the roof boards was a quick job thanks to the good old pneumatic nailgun.

Attaching the tar shingles did take another day for each extension roof:

The covering boards around the extension roof took another day giving it a more finished look.

As a bonus project, I attached the outside lamps. They don’t make much sense yet a week before midsummer but they will come in handy during the winter.

The roof extension project took me five days to complete during my first week of summer vacation. With the exception of the covering boards and the roofing nails, all materials were leftovers of the original workshop building. The careful observer might have noticed that the materials for the next projects have been delivered already (on the right-hand side of the later photos). Stay tuned for more building at the Villa Linnea…
Building w.s. – Electricity
Finally, after 6 months waiting, an electrician has visited us and finalized the electricity work in the workshop! Which means that we’ve got power. Which also means that we are in principle ready for the final building inspection.

Waiting for the electrician we had signed up for the job took all of our patience and a bit more. But after waiting for 6 months we ultimately gave up on him and asked for a replacement. I have never heard so many “reasons” not to show up for a day’s worth of work: the car has broken down, back problems, health issues, engine failure, etc.
The alternative electrician was brilliant. He agreed to come within 2 weeks. He came punctually at exactly 09.00. He worked effectively. What else does one want? Yes, he complained about one set of lamps that were hard to connect because of the tiny parts that maybe only a Chinese kid can work with, but otherwise, he was the typical Finnish professional.

During the control measurement, we identified that one of the cable strings I had pulled was faulty. I must have accidentally have hit the cable with a nail when attaching the wall paneling. He pulled a replacement cable within 15 minutes and that was that.
Now we’ve got connected the 8 power sockets and the lamps on both the workshop side and the garage side. Once we have got the invoice of the electrician we can ask for the final inspection.
Building w.s. – Final landscaping
With winter closing in, it’s already too late to do some decent landscaping, but I decided to get job done as far as I can. There was plenty to do…

I spent already three weekends digging out, filling it with gardening soil, and planting grass in three smaller areas in front of the workshop. But the area around the well was simply too big to finish this year with simply a shovel and a wheelbarrow…
And I also had to even out the roundabout in between the workshop and the villa for which I ordered I truckload of gravel…

I called in reinforcements in order to get the gravel spread and to speed up the landscaping…

Even that this digger isn’t the biggest in the village it gets the job done for which I need a whole weekend in 30 minutes. Slightly depressing. But ultimately more efficient. In the photo above one can see also the 5 m3 soil I had delivered which the digger spread also in no time. But it’s worth the effort (and the money). I only had to the raking to even out the rough work. Now I’m ready for the winter. The remaining grass seeds I can plant next spring.

Farewell! You served us well!
With the workshop building being close to completion (at least when it comes to storing stuff), we decided to get rid of the old garden shed.

I bought this Lillevilla garden shed in 2008 at Bauhaus and transported it in the trailer to the countryside. It was actually building number 2 to be put up (number 1 being the lighthouse toilet). Building the shed from pre-manufactured parts took only one day (since we had no place to seep yet there wasn’t more time to be had anyway). Only attaching the tar shingles was an additional effort much later on when I had leftovers from the guest cottage. The shed has served us well and was hosting in the early days many things including a fridge and tons of drinking water. It was once moved 15 meters to its current location because it has to make space for the new workshop building.

The first step of the removal was to take off the doors and the strengthening support boards I attached at some point. The next step was a bit more dramatic. Firstly, taking out all metal brackets holding the main parts together and then giving it a gentle shove by two people…

This results is pretty much plenty of pieces which can be transported away as such (except the roof which is held together by the tar paper).

The results is one shed less and one parking place more… With the exception of the little pile of roof paper and tar shingles (visible in the back of the photo above) and the metal that went to the recycling, not much was left after the thermal reuse of the wooden parts…

Shady business
When designing the workshop we wanted to have big windows at the front to allow for natural light to flood in, which is especially nice in the summer. Well of course also other times of the year as well, but especially in the summer.
However there are times when you maybe want to work without prying eyes looking at what you’re doing, or maybe just don’t want any one who’s passing by to the able to look in the windows and take stock of what all you have in the workshop.
Initially we thought about some sort of curtains, even blackout curtains, for the large front windows, but came to the conclusion that it would just be unpractical with the curtain rods, and especially on the woodworking side the curtains would gather dust quite quickly. Thus we ended up that blinds would be the most optimal solution, as they are installed between the windows, so they’re protected from the dust, and are easy to pull-up when needed and can be open/closed as desired.
We ordered and received the blinds already in early June, but needed some weeks to gather the inspiration for installing them. The paper instructions that came along with them were quite straightforward, but as for the actual installation process I really can’t comment much, as the Other Half handled that part. I can say it did not take that long and I did not hear much strong language, so let’s presume it went quite smoothly.
Here you can see what it looks like without blinds, with blinds open and with blinds closed:


So now we’re ready for all those secret projects that need to be protected from prying eyes!
Like peas in a pod

Like the famous quote from one of my all time favorite movies, Forrest Gump, “Life is like a box of chocolates. You never know what you’re gonna get”, it applies to life, but also to my vegetable patch!
As I indicated in my earlier post, the vegetable patch was not such a success as I would have expected this year. Potatoes and carrots were fail safe and are thriving, still need to wait for probably at least a month before gathering any harvest, but even the earlier fail safe salads let me down.
But there was a pleasant surprise – peas! On the request of the Girl we this year planted peas for the first time. I looked at several options and specifically selected low-growing ones. The package stated these peas should grow to no higher than 40cm and do not need any support.
Yeah – don’t believe everything you read! After being absent from the country-side for two weeks we went back and the peas had grown and were hanging over both the potatoes as well as the rows of salad seeds. First thing I had to do was to gather up some random pieces of iron rod, some twine and make some sort of frame to lift up the peas from the ground. After this the peas seemed happy and continued to grow.
As of last weekend we were not yet able to gather any of our harvest, but things are looking very good. Some light, water and time should give us a nice amount of self-grown peas. Just need to patiently wait!


Building w.s. – Finishing touches
Two weeks of summer vacation were ideal to put the finishing touches on the workshop (besides other things one does during summer vacations such as doing nothing, picking blueberries, playing mini-golf, and visiting various local places for coffee or pizza).
The covering boards around the roof were the first things to be put in place…

The metal sheet covering the garage door was also an easy two hour project since the floor height fits perfectly to the log beams…

Attaching the ventilation hats took a bit more time because of the scaffolding and safety harness, but after a day the two ventilation hats for the roof and the inside of the workshop were attached…

The covering boards under the dormer window roof presented themselves as some challenge because of the lack of proper scaffolding to reach the required places but with the help of some rather creative solutions the job got done…

The steps to the doors were the last thing to be completed. This time I reused existing materials and recycled old materials from discontinued projects…

The final thing to do is the landscaping, but I believe that can wait until after the final inspection.
Building w.s. – Ceiling panels
Some 1000 meters of ceilings boards, over 3000 nails, and countless weekends later, I finished the job of covering the ceiling of the workshop just before the start of the summer vacation.

The insides of the dormer windows played a major role in slowing me down. The panels for the insides of the dormer windows need to be cut individually with at least one angle of 21,2 degrees and some of them in addition at an angle of 20,4 degrees. This means a lot of climbing up the ladder and down the ladder to get it right. I guess I don’t need to do any step-master exercises in the gym…

The result is pleasing the eye and satisfying for the mind. Even without corner lists, the ceiling looks almost too nice for a workshop. I’m still wondering whether it would have been easier to just screw on plywood but somehow I’m not sure whether that would have saved that much of time and effort. Anyway, this last large task of the workshop is now done too and only smaller finishing jobs are waiting for me in the summer weeks to come.
